AAC Heavyweight M4 (Savage) - Part 2
Game 8 has gone with Nukemaru’s strat for Part 2.
(English subtitled)
Interestingly enough, there isn’t a macro to summarize the entire fight.
Markers
XIVLauncher WaymarkPresetPlugin positions
{
  "Name":"M12S-2",
  "MapID":1075,
  "A":{"X":100.0,"Y":0.0,"Z":86.388,"ID":0,"Active":true},
  "B":{"X":113.612,"Y":0.0,"Z":100.0,"ID":1,"Active":true},
  "C":{"X":100.0,"Y":0.0,"Z":113.612,"ID":2,"Active":true},
  "D":{"X":86.388,"Y":0.0,"Z":100.0,"ID":3,"Active":true},
  "One":{"X":91.833,"Y":0.0,"Z":91.833,"ID":4,"Active":true},
  "Two":{"X":108.167,"Y":0.0,"Z":91.833,"ID":5,"Active":true},
  "Three":{"X":108.167,"Y":0.0,"Z":108.167,"ID":6,"Active":true},
  "Four":{"X":91.833,"Y":0.0,"Z":108.167,"ID":7,"Active":true}
}
Timeline
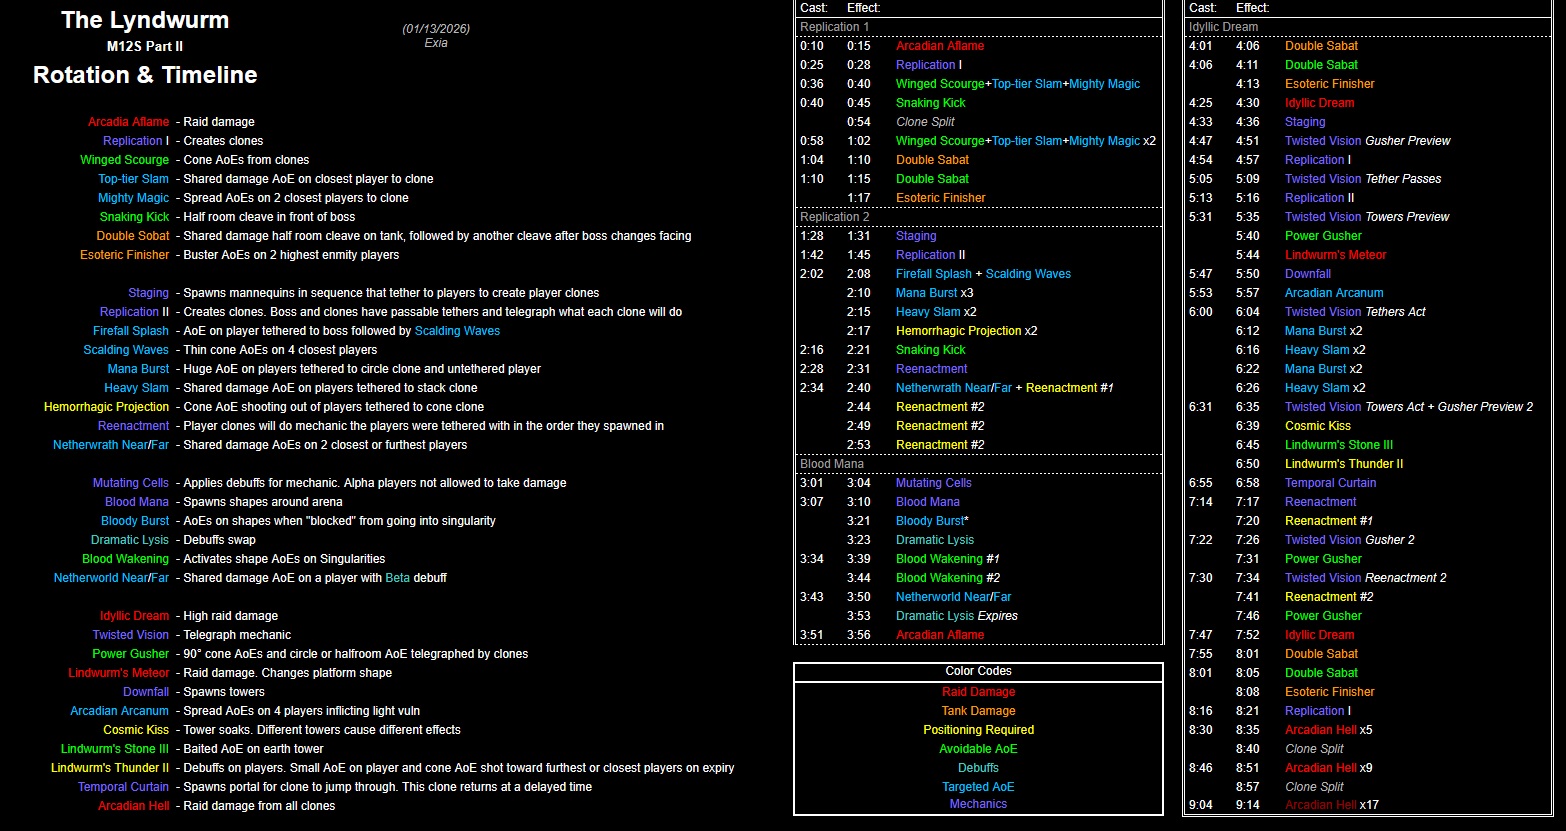 (Credit: u/ExiaKuromonji)
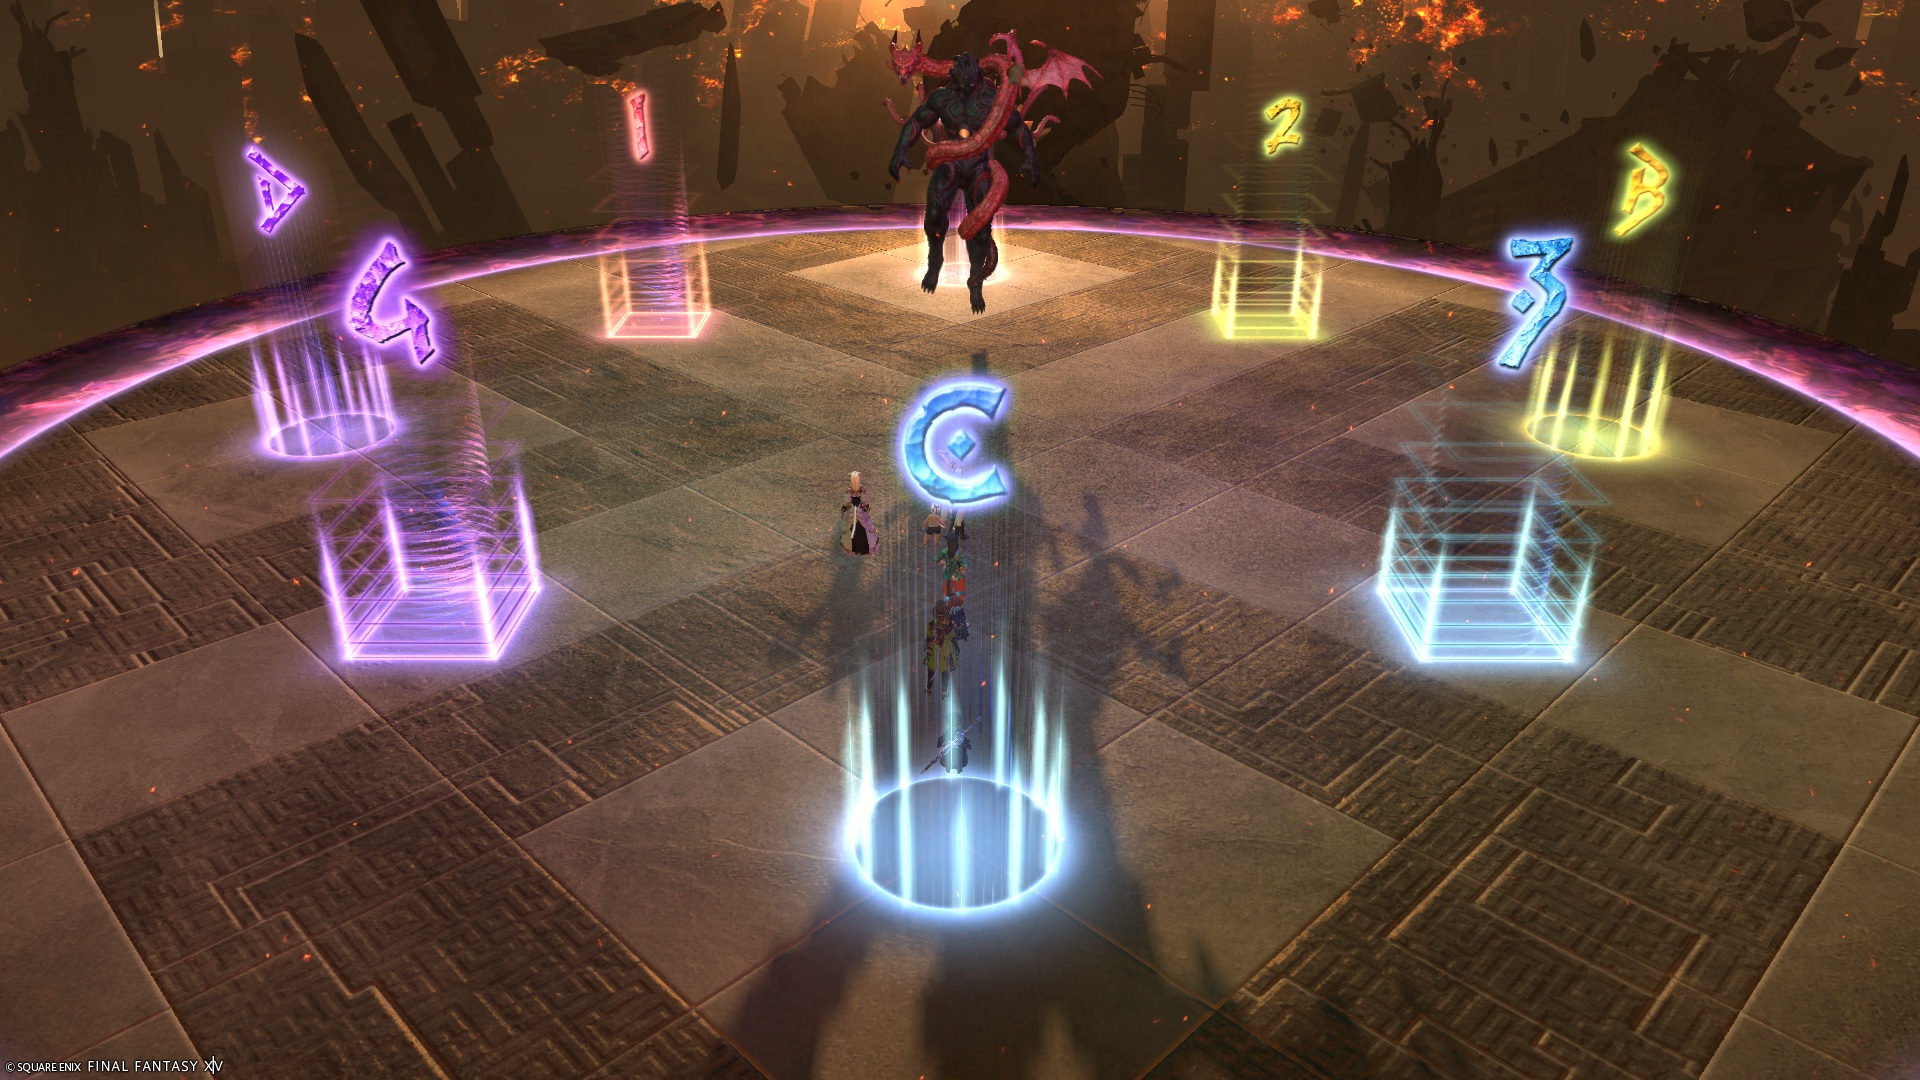
Idyllic Dream
Idyllic Dream is the capstone mechanic of this encounter, spanning over three minutes. It is essentially a souped-up version of Replication #2, executed while crossing between two worlds.
This section just goes through the steps needed to resolve Idyllic Dream.
Nukemaru has also compiled several Idyllic Dream runs that you can reference.
Idyllic Dream Macros
Each player will need to prepare a set of eight macros to mark themselves with, one for each position they could be standing in.
These can also come with /echo reminders to help remember what you’re supposed to do.
[Click to Expand] Idyllic Dream Macros
These macros are to be pressed in Step 4 below, which is where you move to the clone you are tethered to, after you have potentially swapped positions in Step 3.
/micon A waymark
/mk attack4 <me>
/e -----
/e [A] ● Want Stack tether
/e Swap tether with [2] if needed
/e  ※ If you swapped → Defamation first
/e Stack at [3]
/micon 1 waymark
/mk ignore2 <me>
/e -----
/e [1] ★ Want Defamation tether
/e Swap tether with [D] if needed
/e  ※ If you swapped → Defamation first
/e Stack at [4] + You are 2nd Defamation at [1]
/micon B waymark
/mk attack3 <me>
/e -----
/e [B] ● Want Stack tether
/e Swap tether with [3] if needed
/e  ※ If you swapped → Defamation first
/e Stack at [3]
/micon 2 waymark
/mk attack1 <me>
/e -----
/e [2] ★ Want Defamation tether
/e Swap tether with [A] if needed
/e  ※ If you swapped → Defamation first
/e Stack at [3] + You are 1st Defamation at [2]
/micon C waymark
/mk bind1 <me>
/e -----
/e [C] ● Want Stack tether
/e Swap tether with [4] if needed
/e  ※ If you swapped → Defamation first
/e Stack at [4]
/micon 3 waymark
/mk attack2 <me>
/e -----
/e [3] ★ Want Defamation tether
/e Swap tether with [B] if needed
/e  ※ If you swapped → Defamation first
/e Stack at [3] + You are 2nd Defamation at [2]
/micon D waymark
/mk bind2 <me>
/e -----
/e [D] ● Want Stack tether
/e Swap tether with [1] if needed
/e  ※ If you swapped → Defamation first
/e Stack at [4]
/micon 4 waymark
/mk ignore1 <me>
/e -----
/e [4] ★ Want Defamation tether
/e Swap tether with [C] if needed
/e  ※ If you swapped → Defamation first
/e Stack at [4] + You are 1st Defamation at [1]
| 1. Four clones will spawn at either the cardinal, or intercardinal positions. Remember which spawned first, the cardinal or intercardinal. This will come into play in Step 16. | |
 | 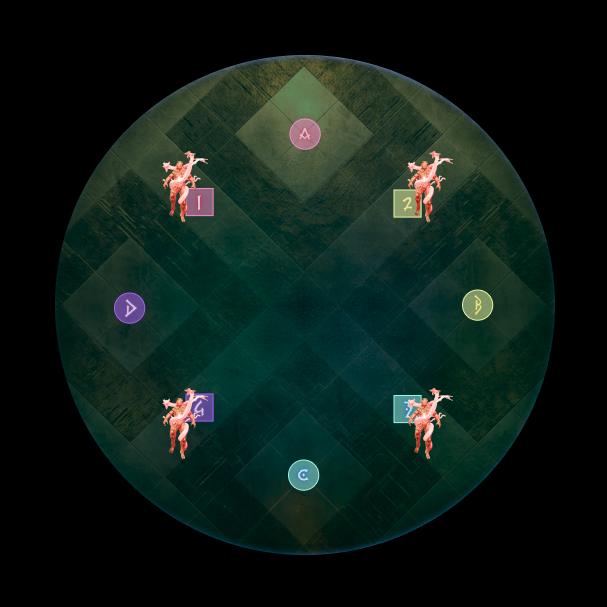 |
2. The other four clones will spawn. |  |
| 3. Each clone will tether to a player. Move to the clone you are tethered to, except:
| 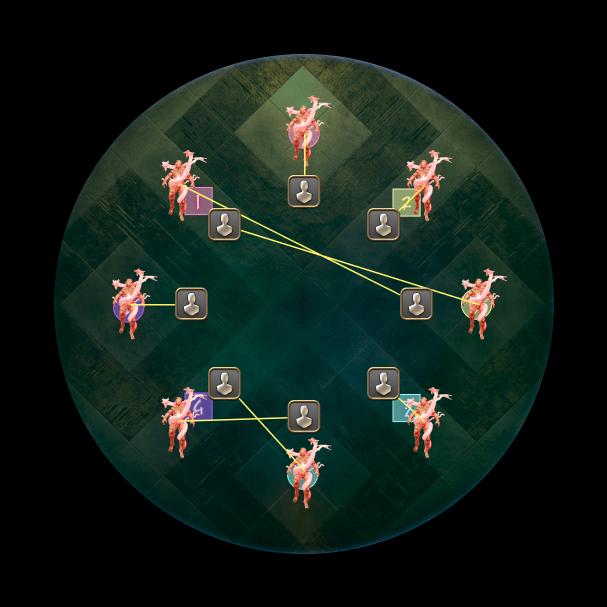 |
| 4. This is where you then hit the appropriate macro to mark yourself with the specified marker based on where you are standing.
| 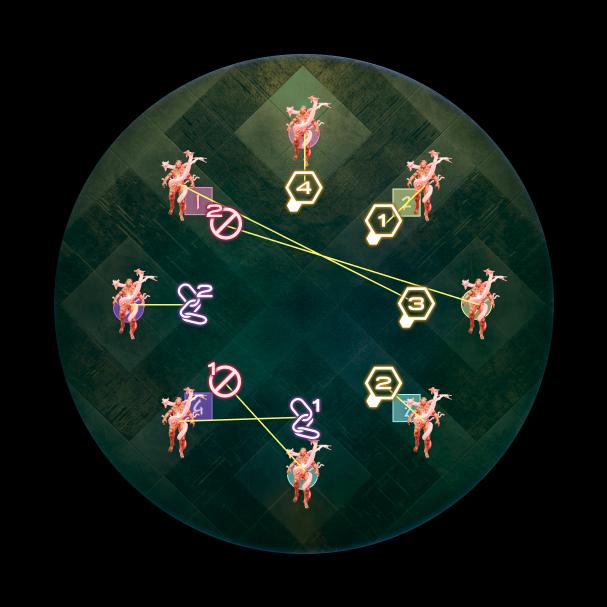 |
| 5. Three clones will appear and telegraph some AoEs. These are just telegraphs- they will not resolve (yet). However, either the North or the South will be safe. Remember which side is safe, North or South. This will come into play in Step 7 and 14. | |
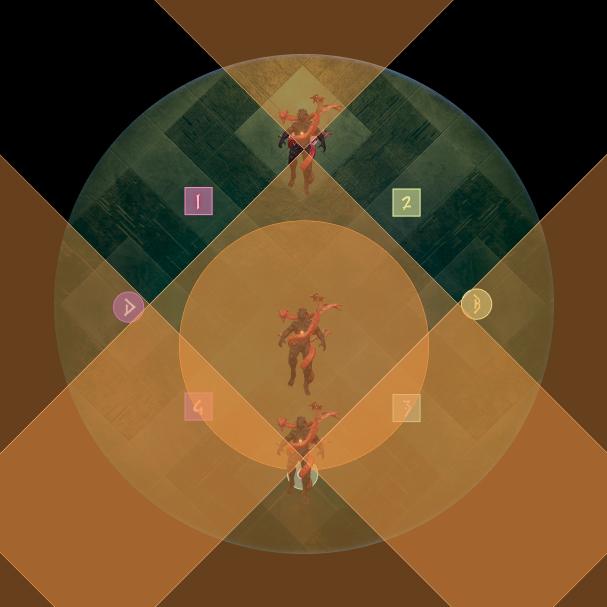 North side is safe. North side is safe. | 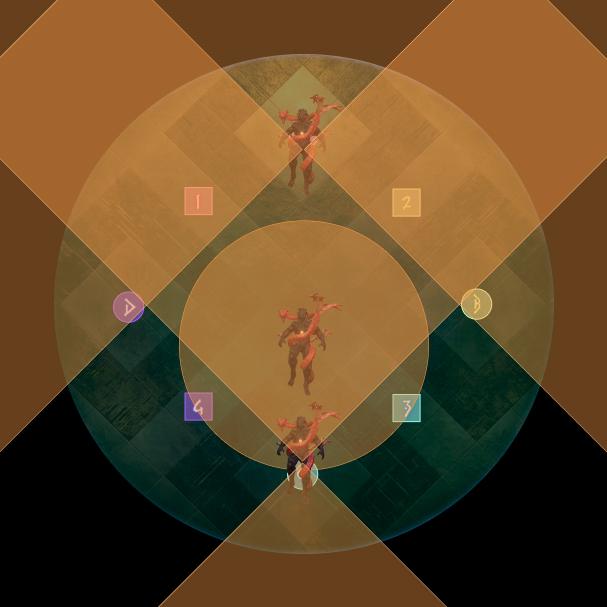 South side is safe. South side is safe. |
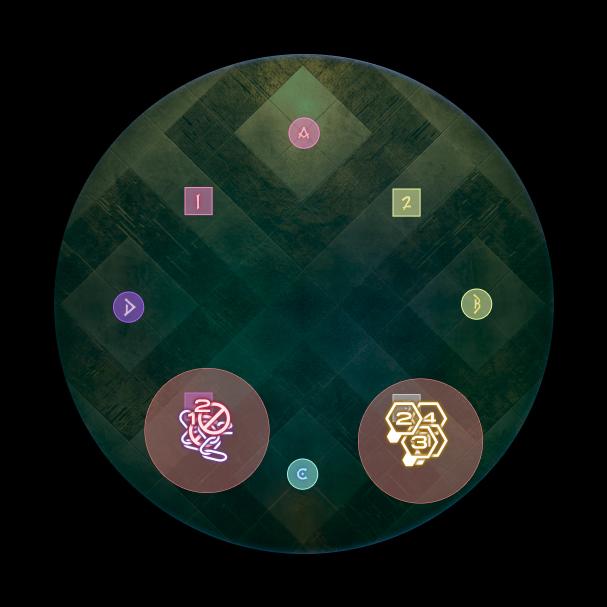
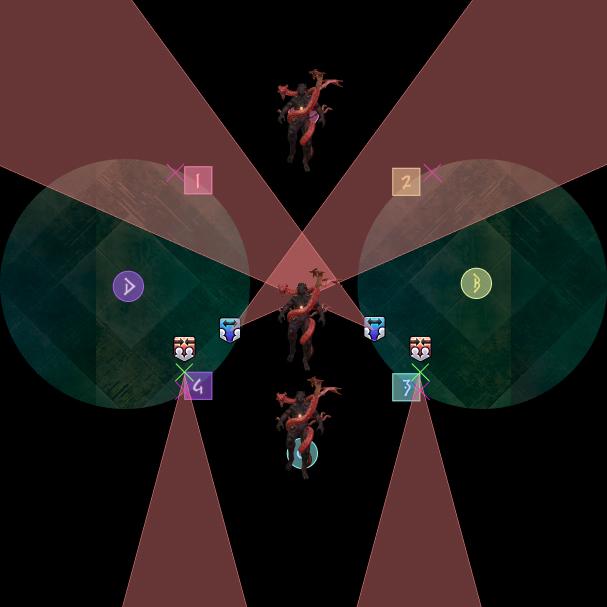
| 6. Starting from North + South and going clockwise, four pairs of clones spawn in order (making eight clones in total). After all eight clones have appeared, they will tether to players with alternating 4-man stacks, and large AoE effects.
Swap with your assigned partner if you need to. Remember whether the cardinal clones were stacks or AoEs. This will come into play in Step 11. | |
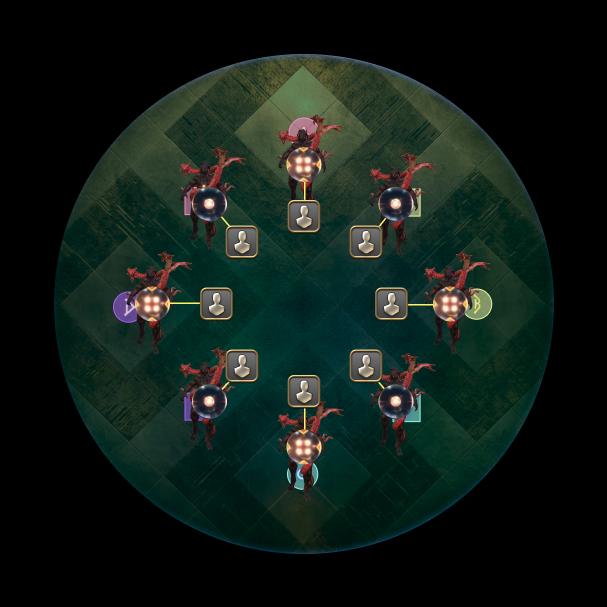 Cardinal clones are 4-man stacks. Cardinal clones are 4-man stacks. | 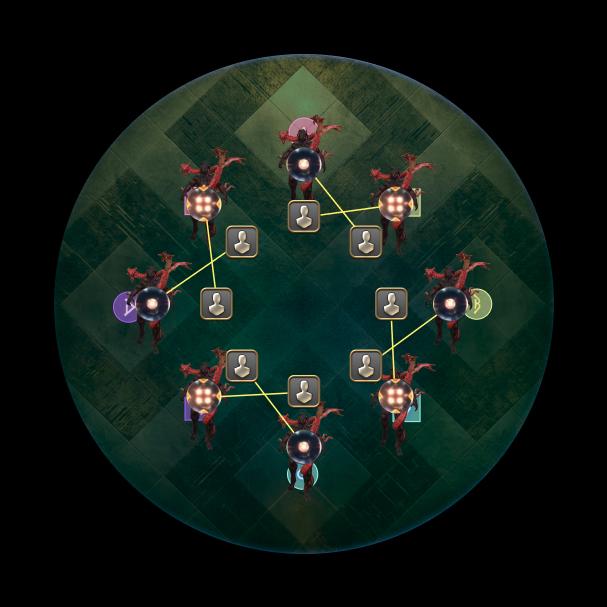 Cardinal clones are AoEs. Cardinal clones are AoEs. |
At this point, all players should be marked, and you should have taken note of:
- Whether the cardinal or intercardinal clones spawned first (Step 1).
- Whether the North or South side is safe (Step 5).
- Whether the cardinal clones had the 4-man stack, or Defamation effect on them (Step 6).
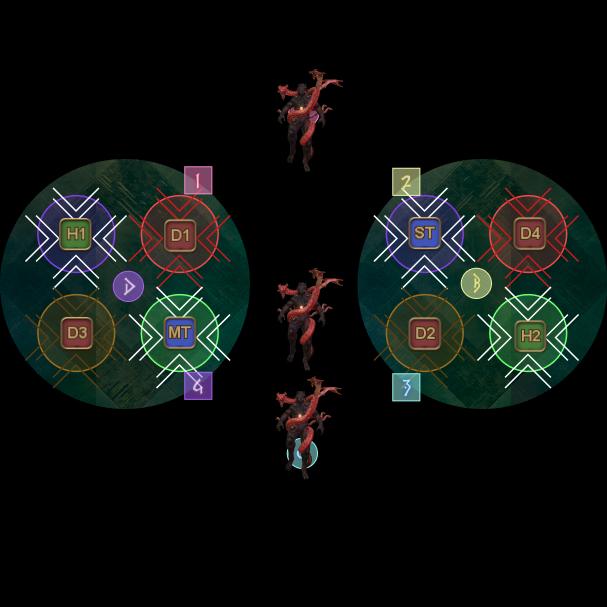
| 7. After the tethers have locked in and cannot be transferred, move to the safe spots (from Step 5) to dodge the clone's cleaves. A telegraph will appear on the ground leaving two islands. | 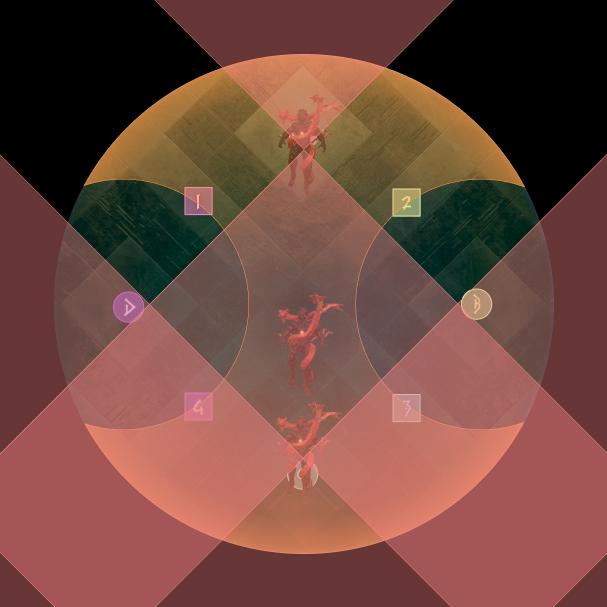 |
| 8. Move to your assigned island. This will also be heavy raid-wide damage.
| 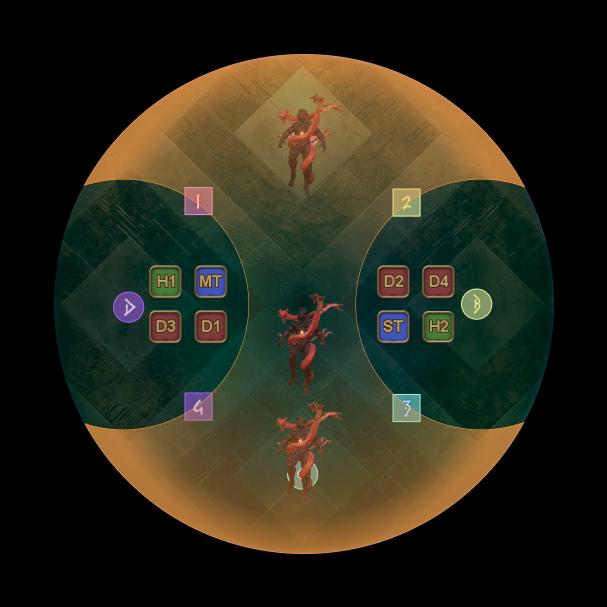 |
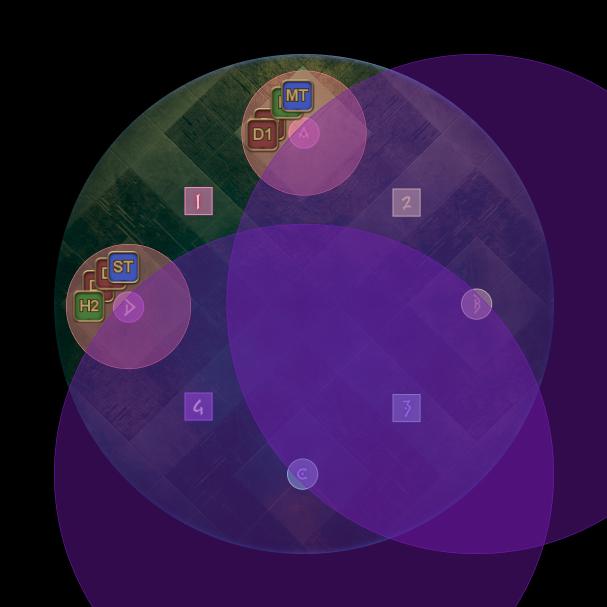
| 9. Each island will have four elemental-aspected towers. Spread out in your assigned tower. Facing the boss:
| 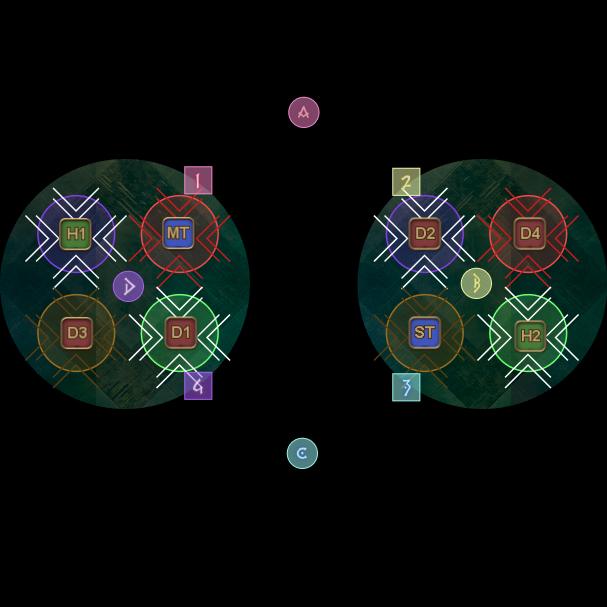 |
| 10. Either all the tanks/healers, or all the DPS will get hit with Arcadian Arcanum, a point-blank AoE that also applies Light Resistance Down II. These players cannot take the light-aspected towers (wind or darkness), and will need to swap with their melee/ranged partner. Either all the melee, or all the ranged will need to swap. After swapping, remember where your tower is (front-left, etc.), and what element it is for Step 12. | 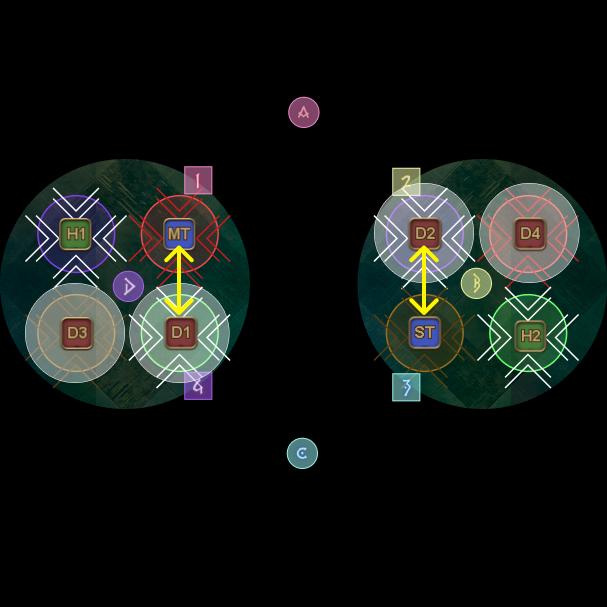 |
Now, we start bringing back past information.
| 11. The full arena returns. We now resolve the player effects set in Step 6.
The following two steps will alternate between them for a total of two sets (i.e: Defamation → Stacks → Defamation → Stacks or Stacks → Defamation → Stacks → Defamation). Which one comes first depends on what effect the cardinal clones in Step 6 had. | |
 Cardinal clones were 4-man stacks. Cardinal clones were 4-man stacks.
| 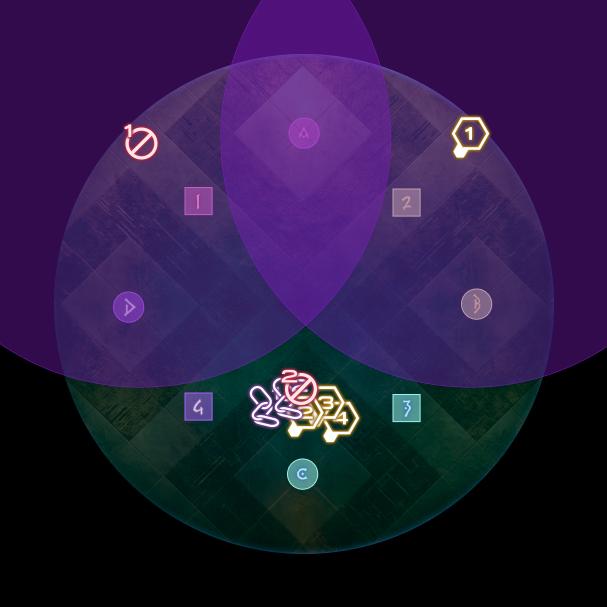 Cardinal clones were AoEs. Cardinal clones were AoEs.
|
From this point onwards, the markers on each player are no longer needed.
| 12. Return to your tower positions from Step 10, and resolve your towers.
|  |
| 13. Healers Esuna the two players that baited the Doom beam from the Dark towers. Bait the near and far cone AoEs.
|  |
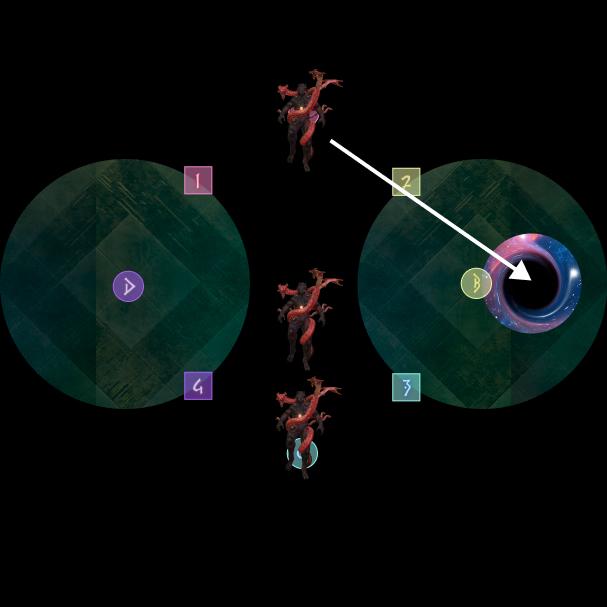
| 14. A portal will open up, and either the North or South clone will get sucked in. Remember which clone got sucked in. In particular, it may be easier to remember if the clone was on the safe or unsafe side in Step 5.
|  |
| 15. This leaves two clones behind. Pay attention to the remaining North/South clone. Each clone will go to one island each. Remember which island the remaining North/South clone went to. This will come into play in Step 17. | 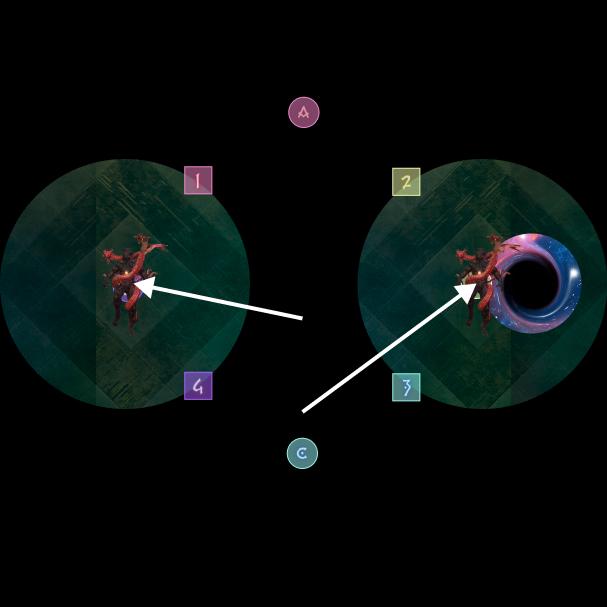 |
At this point, you should have taken note of:
- Whether the cardinal or intercardinal clones spawned first (Step 1).
- Whether you are going inside or outside the boss (Step 14).
- Which island is safe (Step 15).
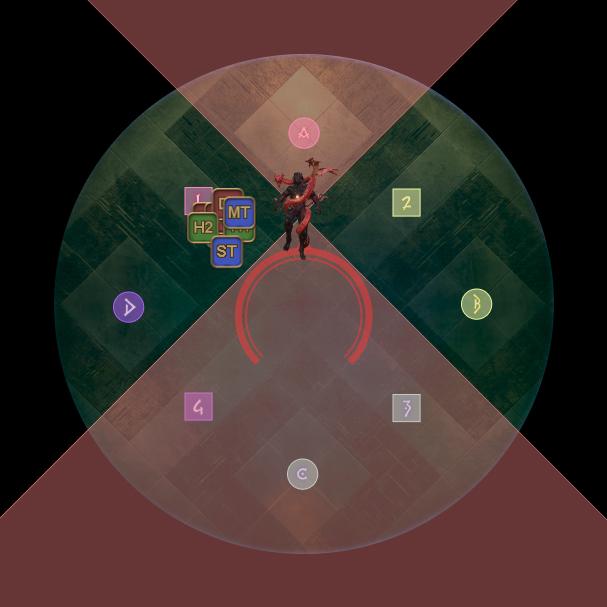
| 16. We return to the full arena, and now resolve the player clone effects set in Step 6. The clones that appeared first in Step 1 will resolve first.
Notice the stacks are resolved a little past the markers. | |
 Cardinal clones appeared first. Cardinal clones appeared first. | 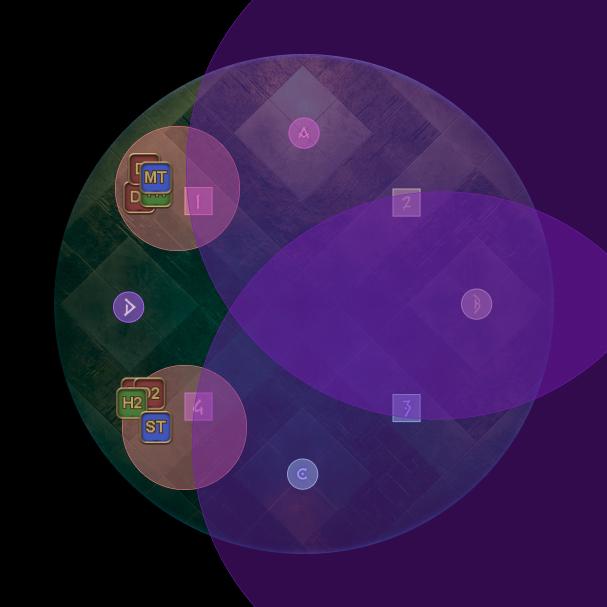 Intercardinal clones appeared first. Intercardinal clones appeared first. |
| 17. We return to the two islands. Go to the island that the North/South clone went to in Step 15. The clone on this island will cleave either the North/South, or East/West, depending on which direction the clone cleaved in Step 5. (The other island holds the center clone, which does a point-blank AoE covering the entire island.) | |
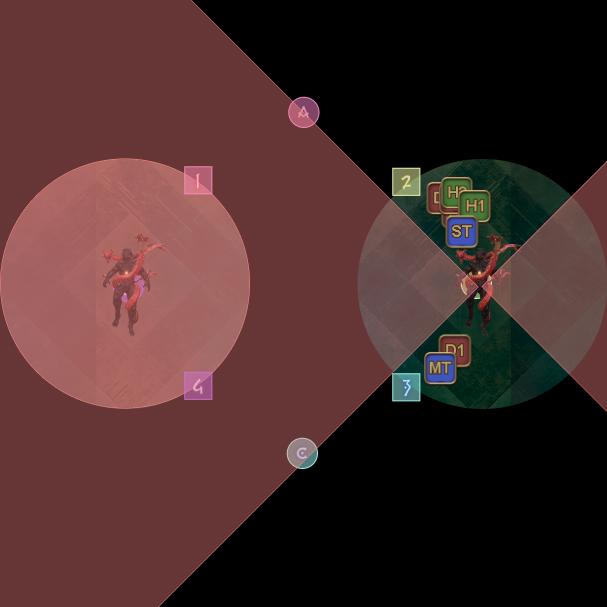 The safe clone was sucked in- be outside the boss. The safe clone was sucked in- be outside the boss. | 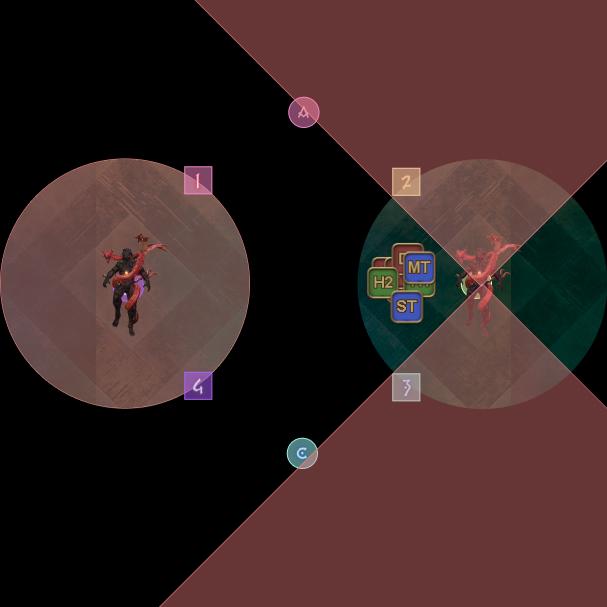 The unsafe clone was sucked in- be inside the boss. The unsafe clone was sucked in- be inside the boss. |
| 18. We return to the full arena, and now resolve the second set of player clone effects set in Step 6. The clones that appeared second in Step 2 will now resolve. This is simply the opposite configuration of Step 16. | |
| Intercardinal clones appeared second. | Cardinal clones appeared second. |
| 19. We return to the full arena, where the clone that got pulled into the portal earlier in Step 14 has returned. This clone will reappear North, and cleave either North/South, or East/West, depending on the direction in Step 5. | |
 The safe clone was sucked in- be outside the boss. The safe clone was sucked in- be outside the boss. | 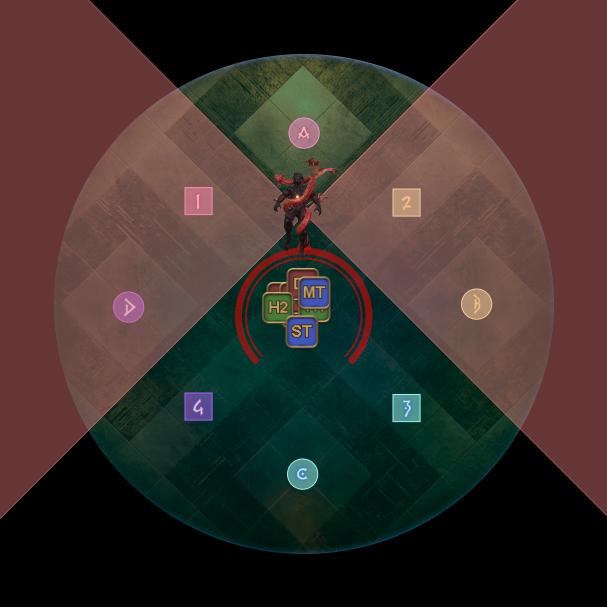 The unsafe clone was sucked in- be inside the boss. The unsafe clone was sucked in- be inside the boss. |
The boss will then cast another Idyllic Dream (heavy raid-wide) to conclude the mechanic.
Frequently Asked Questions
[Idyllic Dream] Why do we need to criss-cross some tethers at the start?
| When the player clones resolve their effects in Step 16 and Step 18 above, they do so in two waves in the order they appeared in Step 1 and Step 2- cardinal vs. intercardinal clones. However, because the base effects assigned in Step 6 alternate between 4-man stacks and Defamations, if we did nothing, then all four 4-man stacks, or all four Defamations would resolve together in Steps 16 and 18, which is impossible to resolve successfully. This is the core puzzle behind Idyllic Dream that the party needs to solve. | |
| So, the goal is to split the player clones and assign them effects like so; in particular:
That way, when each set of cardinal or intercardinal clones resolve in Step 16 and Step 18, each set has two 4-man stacks, and two Defamations each. | 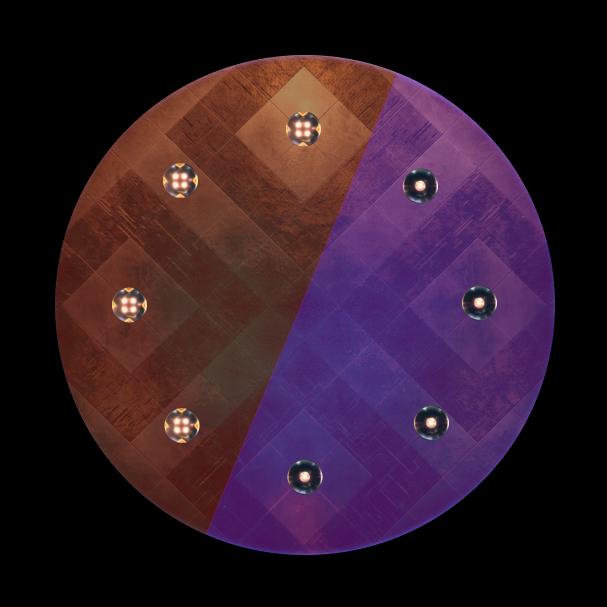 |
| While the four players at the boundary (N, NE, SW, S) can exchange effects easily, the two pairs of players deep inside their half cannot (W, NW, and E, SE), because if they swapped, there would still be one clone with the opposite effect in that half of the arena. This is why there is a swap between the NW and E players at the start- this lets the now East player (who is assigning their effect to the NW clone) pick between the E and SE effects to give the NW clone the 4-man stack. Likewise, this lets the now NW player (who is assigning their effect to the East clone) to pick between the W and NW effects to give the East clone Defamation. | |
| The second swap between the South and SW players at the start technically isn't strictly necessary, as long as you remember that you want the SW clone to end with a stack, and the South clone with Defamation. However, swapping their positions in Step 3 unifies the tether swaps in Step 6- if one pair swaps tethers, then all pairs swap tethers. This makes things neater, easy to call out, and lets the SW and South players "follow everyone else" if they see everyone else doing something they're not. | |