AAC Heavyweight M3 (Savage)
Game8 has gone along with Nukemaru’s guide, which goes over the PF strat.
(English subtitled)
- Lucrezia as the base strat.
- Dance of Dominion safe spot relative.
- Facing the boss North during Orbital Omen.
- Meteor Rain baited with Healer, then Ranged, then Melee.
- ZizieZip’s strat for Majestic Meteor (“Champion’s Meteor” or “Cメテオ” in Japanese).
- DXA strat for Ecliptic Stampede.
Things to check on Party Finder
- Whether the tanks + melee are using True North (i.e: MT+D1 goes N/W, and ST+D2 goes S/E), or safe-row-relative positions in Dance of Domination Trophy.
- Whether you are doing DXA or Totan v2 for Ecliptic Stampede.
- Which way the MT is going to rotate for the second set of Great Wall of Fire.
Approximate milestones
- Under 46% HP when the party gets knocked into the air when the arena gets split.
English
This uses the DXA strat for Ecliptic Stampede.
■ Basic Spread ー ■ Tornado Baits ーーーーーーー
 D3  MT  D4     D3 MT
 H1   ☆   H2    H1   D4
 D1   ST  D2       D1   H2
            ST  D2
■ Void Stardust:Start South, go CW
■ Dance of Domination Trophy ーーーーーーーー
 H1D3      H2D4  ※ Use safe edge
 MTD1 ★ ST D2    as North
■ Meteor Rain ーーーーーーーーーーーーーーーーー
 1st   H1:SW (far)  H2:NE (near)
 2nd D3: SW (mid)  D4:SE (near)
 3rd  D1:SW (near)     D2:NE (near)
 Tank tethers: MT→tether to NE/SE Meteor
            ST→ tether to SW Meteor
■ Majestic Meteor (ZizieZip) ーーーーーーーーー
 ◯ 1st towers   ※ Drop AoEs from boss
     MTD3   H2D4   along crack to N/S edge
     H1D1   ST D2
 ◯ 2nd towers:same quadrant where you
         resolved 1st tether + mark
■ Ecliptic Stampede (DXA) ーーーーーーーーーー
 Range Puddles: (North) H1 D3 D4 H2 (South)
 Melee AoEs:Under boss → A → CW
 Towers (CW from West):
  1st:MT, D1 + D2
  2nd:ST, 2x unmarked range
 Tethers:Stretch to opposite CW corner
 Four-way baits:
  NW → 1st marked range
  NE → Untethered Melee
  SW → Untethered Range
  SE → 2nd marked Range
 Two-way baits:
  W → Untethered Range
  E → Untethered Melee
This uses Totan’s strat (v2) for Ecliptic Stampede.
■ Basic Spread ー ■ Tornado Baits ーーーーーーー
 D3  MT  D4     D3 MT
 H1   ☆   H2    H1   D4
 D1   ST  D2       D1   H2
            ST  D2
■ Void Stardust:Start South, go CW
■ Dance of Domination Trophy ーーーーーーーー
 H1D3      H2D4  ※ Use safe edge
 MTD1 ★ ST D2    as North
■ Meteor Rain ーーーーーーーーーーーーーーーーー
 1st   H1:SW (far)  H2:NE (near)
 2nd D3: SW (mid)  D4:SE (near)
 3rd  D1:SW (near)     D2:NE (near)
 Tank tethers: MT→tether to NE/SE Meteor
            ST→ tether to SW Meteor
■ Majestic Meteor (ZizieZip) ーーーーーーーーー
 ◯ 1st towers   ※ Drop AoEs from boss
     MTD3   H2D4   along crack to N/S edge
     H1D1   ST D2
 ◯ 2nd towers:same quadrant where you
         resolved 1st tether + mark
■ Ecliptic Stampede (Totan v2) ーーーーーーーー
 Range Puddles: (North) H1 D3 H2 D4 (South)
 Melee AoEs:Under boss → A → CW
 Towers (CW from North):
  1st:MT, D1 + 1st unmarked range
  2nd:ST, D2 + 2nd unmarked range
 Tethers:Stretch to opposite CW corner
 Four-way baits:
  NW → 1st marked range   NE → D1
  SW → D2   SE → 2nd marked range
 Two-way baits: W → D2   E → D1
Japanese
This uses the DXA strat for Ecliptic Stampede.
■基本散開  ■ミールストーム誘導
 D3  MT  D4               D3MT
 H1   ☆   H2            H1       D4
 D1   ST  D2     D1  H2
             STD2
■コメットレイン:近接はボス背面から時計
■ドミネーション:安置を北に見て
 H1D3      H2D4
 MTD1 ★ ST D2
■メテオレイン
1回目 H1:南西遠    H2:北東タゲサ上
2回目 D3:南西中間   D4:南東タゲサ上
3回目 D1:南西タゲサ上     D2:北東タゲサ上
タンク線取り(隕石基準) MT:23マカ、ST:4マカ
■チャンピオンズメテオ(ジジー式位置固定)
◯塔踏み1回目 ※範囲捨てボス下から割れ目沿い南北
    MTD3   H2D4
    H1D1   ST D2
◯塔踏み2回目:1回目処理位置近くに同じペアで入る
■メテオスタンピード(DXA式)
   沼捨て: 北 H1D3 / 南 H2D4 (D調整)
   範囲捨て:ボス下→A→時計回り
 〈MT、近接ペア〉1から時計回り塔
 〈ST 、遠隔ペア 〉4から反時計回り塔
   線持ち:穴を背にして右前に伸ばす
【フォーウェイ】X字ペア
 〈内側誘導〉①北沼 ②無職近接 ③南沼 ④無職遠隔
【ツーウェイ】東西4:4
 〈内側誘導〉西:反時計2人塔線無、東:時計2人塔線無
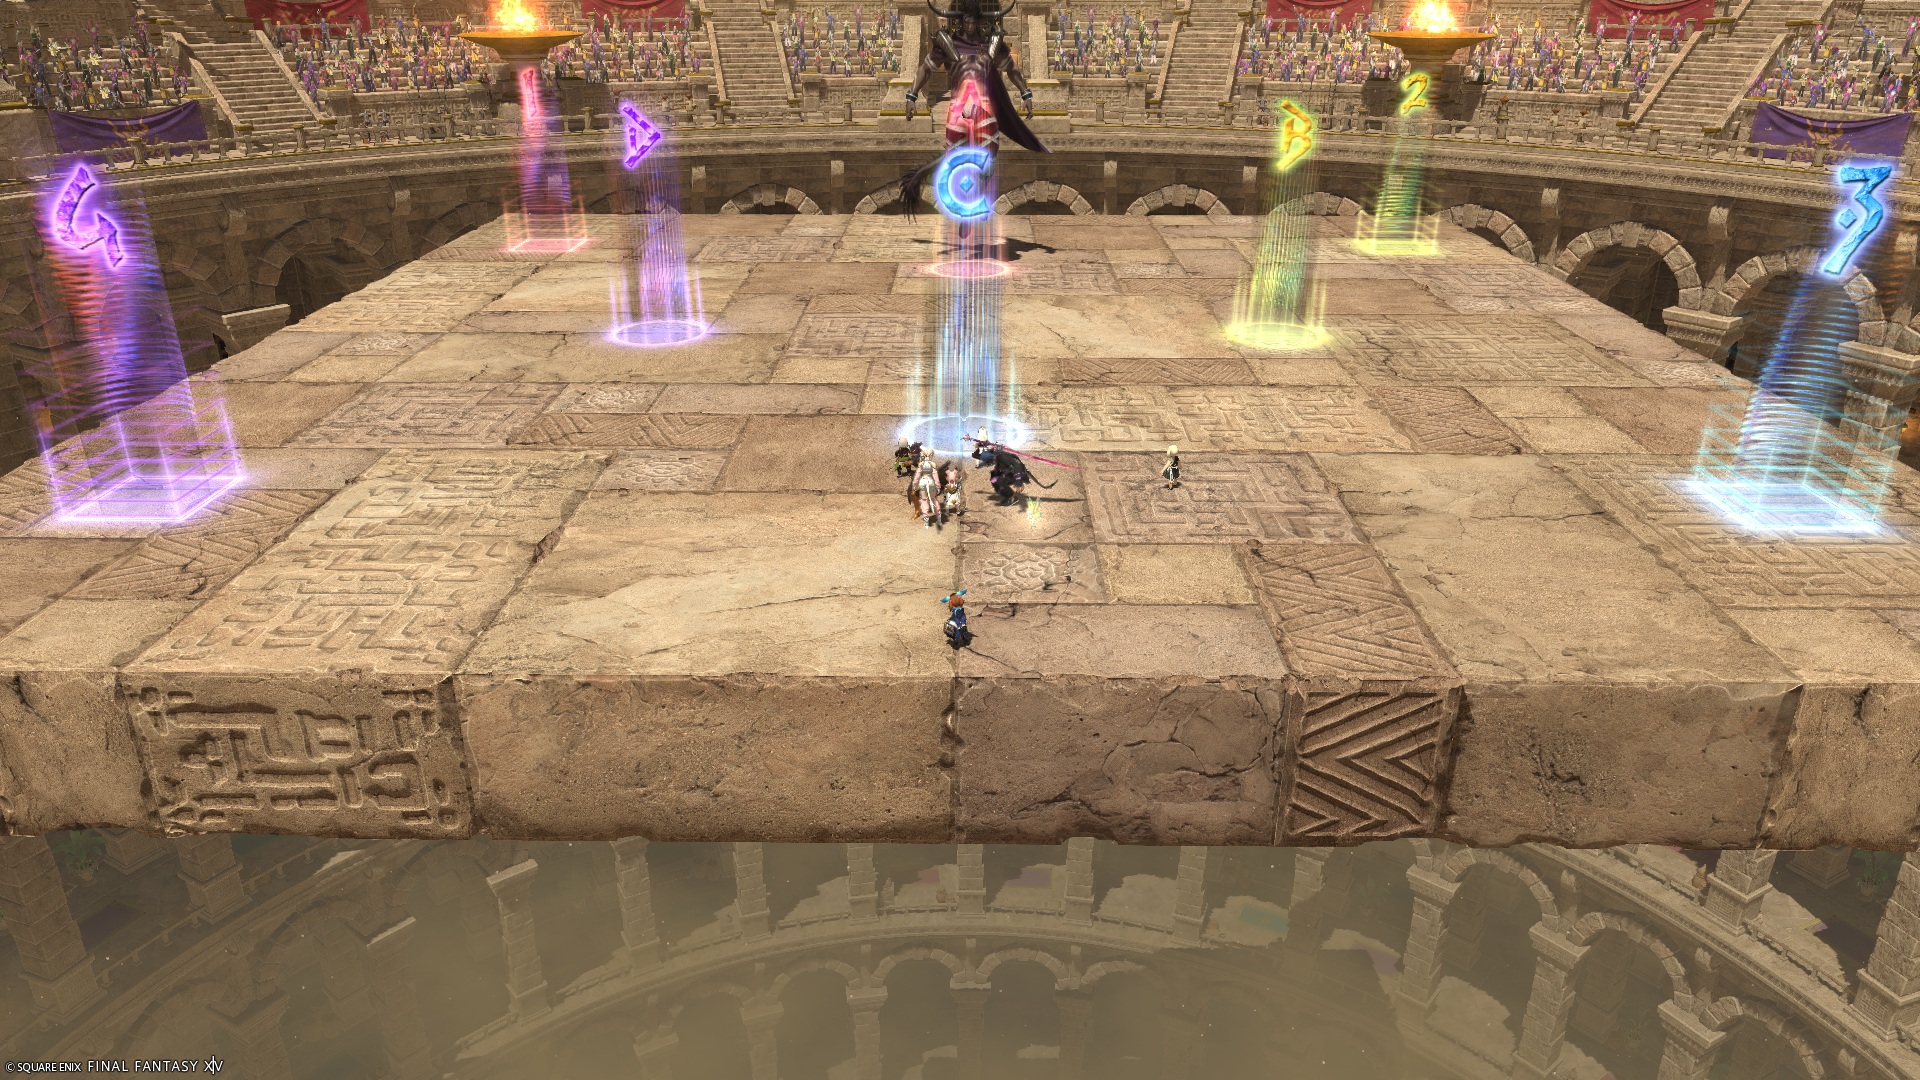
Markers
- The
ABCDmarkers are potential melee safe spots for Dance of Domination Trophy. - The
1234markers are for Majestic Meteor. In particular, marked players need to stand on the inner corner of the marker (not the center!).
XIVLauncher WaymarkPresetPlugin positions
{
  "Name":"M11S",
  "MapID":1073,
  "A":{"X":100.0,"Y":0.0,"Z":91.125,"ID":0,"Active":true},
  "B":{"X":108.875,"Y":0.0,"Z":100.0,"ID":1,"Active":true},
  "C":{"X":100.0,"Y":0.0,"Z":108.875,"ID":2,"Active":true},
  "D":{"X":91.125,"Y":0.0,"Z":100.0,"ID":3,"Active":true},
  "One":{"X":84.0,"Y":0.0,"Z":87.0,"ID":4,"Active":true},
  "Two":{"X":116.0,"Y":0.0,"Z":87.0,"ID":5,"Active":true},
  "Three":{"X":116.0,"Y":0.0,"Z":113.0,"ID":6,"Active":true},
  "Four":{"X":84.0,"Y":0.0,"Z":113.0,"ID":7,"Active":true}
}
Ecliptic Stampede (Totan strat)
Totan’s strat (v2) is gaining in popularity:
大変恐縮ながら「とたん式」なんて名称もいただきびっくりしております。
— とたん やね (@ff14_totan) January 16, 2026
様々なご意見伺いまして、最初の遠隔散会上下のほうがいいんじゃね?とご意見いただき同感ですので、そこだけ変更したver2スライドも掲載しておきます。
なお、遠隔優先順位についても意見いただいていますが、それは臨機応変に pic.twitter.com/tZLruQxLlj
It is basically identical to the DXA strat, except for who takes which towers, and an additional detail on where to stand in the tower.
The main benefit is that Totan v2 guarantees the melee DPS have full uptime on the boss during the part where four players have to stretch tethers.
| DXA | Totan v2 | |
|---|---|---|
| Which healer/ranged goes North/South | From North-to-South: H1 > D3 > D4 > H2 | From North-to-South: H1 > D3 > H2 > D4 |
| Where to count the 1st and 2nd tower from | Start from West and go clockwise. | Start from North and go clockwise. |
| Who takes the 2-man towers |
|
Where the unmarked range follow the priority: H1 > D3 > H2 > D4 |
| Where people stand in the tower | Anywhere within the tower. |
This baits the tethers onto the ranged players. |
Timeline
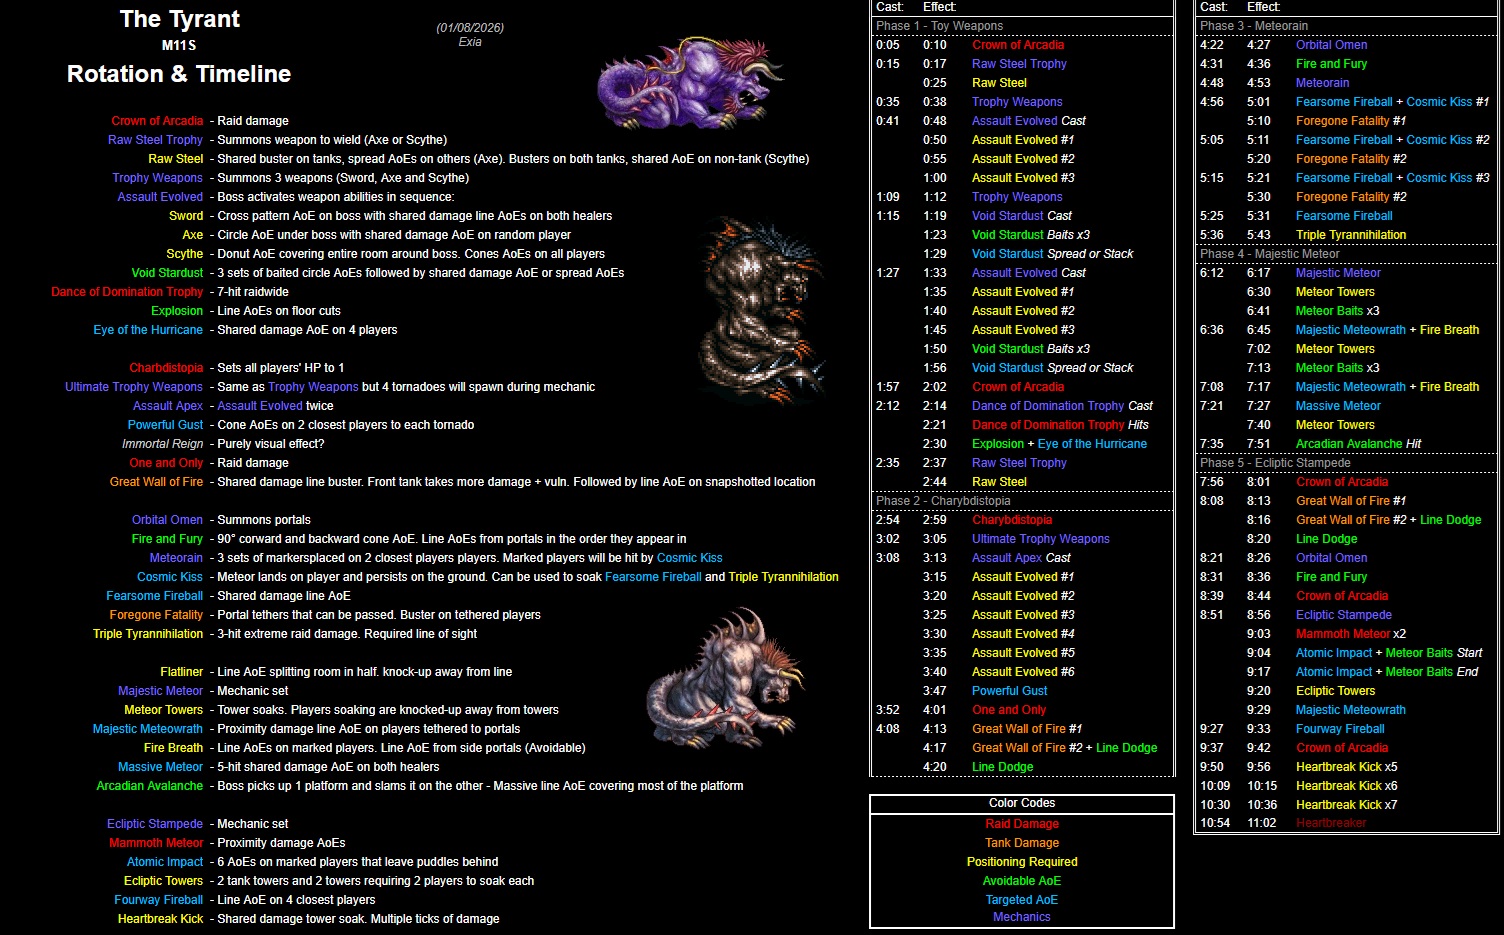 (Credit: u/ExiaKuromonji)
Frequently Asked Questions
[Majestic Meteor] What is Cメテオ?
| Cメテオ is short for "Champion's Meteor", which is the Japanese name for Majestic Meteor(チャンピオンズ・メテオ). |
Troubleshooting
[Majestic Meteor] Why is this so difficult to heal?
| This particular affects the two ranged DPS that go straight for the second set of knockback towers. While this is understandable (especially early on when trying to learn the mechanic), this keeps them outside AoE healing range from at least one healer. In addition, unlike many mechanics that split the party into two, there is no guarantee that a healer will be on each platform with Majestic Meteor, in which case ranged DPS that go straight for the tower can completely miss all AoE heals. The solution is simple- all players go towards the middle after the first wave, including the range DPS. |